CentOS5.3安装Oracle11g(图文)(三)
接下来是配置环境了
设置用户
[root@localhost /]# groupadd oinstall (创建用户组oinstall)
[root@localhost /]# groupadd dba(创建用户组dba)
[root@localhost /]# cd /
[root@localhost /]# mkdir –p /fantlam/oracle
(建立目录 mkdir命令:-p 确保目录名称存在,不存在的就建一个)
[root@localhost /]# useradd –g oinstall –G dba –d /fantlam/oracle oracle( 添加oracle用户到oinstall组dba副组 到/fantlam/oracle目录中 )
[root@localhost /]# passwd oracle(设置密码)
[root@localhost /]# chown -R oracle:oinstall fantlam(改目录组)
[root@localhost /]# ls -al(可以看到红色部分已经改了)
总计 172
drwxr-xr-x 24 root root 4096 08-02 23:39 .
drwxr-xr-x 24 root root 4096 08-02 23:39 ..
-rw-r--r-- 1 root root 0 08-02 22:44 .autofsck
drwxr-xr-x 2 root root 4096 08-02 22:24 bin
drwxr-xr-x 3 root root 4096 08-02 22:19 boot
drwxr-xr-x 11 root root 4020 08-02 22:49 dev
drwxr-xr-x 98 root root 12288 08-02 23:42 etc
drwxr-xr-x 3 oracle oinstall 4096 08-02 23:39 fantlam
drwxr-xr-x 2 root root 4096 08-02 23:36 home
drwxr-xr-x 13 root root 4096 08-02 22:24 lib
drwx------ 2 root root 16384 08-02 22:06 lost+found
drwxr-xr-x 2 root root 4096 03-10 06:42 media
drwxr-xr-x 2 root root 0 08-02 22:46 misc
drwxr-xr-x 2 root root 4096 03-10 06:42 mnt
drwxr-xr-x 2 root root 0 08-02 22:46 net
drwxr-xr-x 2 root root 4096 03-10 06:42 opt
dr-xr-xr-x 137 root root 0 08-02 22:43 proc
drwxr-x--- 16 root root 4096 08-02 23:00 root
drwxr-xr-x 2 root root 12288 08-02 22:22 sbin
drwxr-xr-x 4 root root 0 08-02 22:43 selinux
drwxr-xr-x 2 root root 4096 03-10 06:42 srv
drwxr-xr-x 11 root root 0 08-02 22:43 sys
drwxrwxrwt 10 root root 4096 08-02 23:00 tmp
drwxr-xr-x 14 root root 4096 08-02 22:17 usr
drwxr-xr-x 22 root root 4096 08-02 22:26 var
[root@localhost /]# id nobody (确保用户存在)
uid=99(nobody) gid=99(nobody) groups=99(nobody) context=root:system_r:unconfined_t:SystemLow-SystemHigh
关于域名的配置,为了保证安装过程不会出现意外 需要做一些配置
一下几个命令是文档给出的
[root@localhost /]# cat /etc/nsswitch.conf | grep hosts
#hosts: db files nisplus nis dns
hosts: files dns
[root@localhost /]# hostname
localhost.localdomain
[root@localhost /]# domainname
(none)
[root@localhost /]# cat /etc/hosts
# Do not remove the following line, or various programs
# that require network functionality will fail.
127.0.0.1 localhost.localdomain localhost
::1 localhost6.localdomain6 localhost6
主要是这里 我修改一下文件 加上一行
[root@localhost /]# vi /etc/hosts
You have mail in /var/spool/mail/root
[root@localhost /]# cat /etc/hosts
# Do not remove the following line, or various programs
# that require network functionality will fail.
127.0.0.1 localhost.localdomain localhost
192.168.1.103 localhost.localdomain localhost
#::1 localhost6.localdomain6 localhost6
[root@localhost /]#
接下来配置三个重要文件 直接把它加到文件的最后
[root@localhost /]#vi /etc/sysctl.conf
kernel.shmall = 2097152
kernel.shmmax = 2147483648
kernel.shmmni = 4096
kernel.sem = 250 32000 100 128
net.ipv4.ip_local_port_range = 1024 65000
net.core.rmem_default = 262144
net.core.rmem_max = 4194304
net.core.wmem_default = 262144
net.core.wmem_max = 262144
[root@localhost /]#vi /etc/security/limits.conf
oracle soft nproc 2047
oracle hard nproc 16384
oracle soft nofile 1024
oracle hard nofile 65536
[root@localhost /]# vi /etc/profile
if [ $USER = "oracle" ]; then
if [ $SHELL = "/bin/ksh" ]; then
ulimit -p 16384
ulimit -n 65536
else
ulimit -u 16384 -n 65536
fi
fi
切换到oracle用户,注意要用 su - root 命令(注意,‘-’的左右都有空格!)这样才确保把环境带过去
如果只是su root是不会把环境带过去的
[root@localhost /]# su - oracle
[oracle@localhost ~]$ ls -al
总计 48
drwx------ 3 oracle oinstall 4096 08-03 00:16 .
drwxr-xr-x 3 oracle oinstall 4096 08-03 00:16 ..
-rw-r--r-- 1 oracle oinstall 33 08-03 00:16 .bash_logout
-rw-r--r-- 1 oracle oinstall 176 08-03 00:16 .bash_profile
-rw-r--r-- 1 oracle oinstall 124 08-03 00:16 .bashrc
drwxr-xr-x 4 oracle oinstall 4096 08-03 00:16 .mozilla
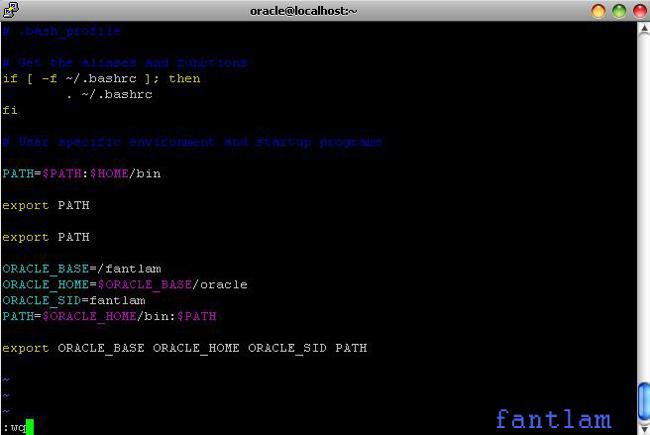
[oracle@localhost ~]$ vi .bash_profile(设置环境变量)
export PATH
ORACLE_BASE=/fantlam
ORACLE_HOME=$ORACLE_BASE/oracle
ORACLE_SID=fantlam
PATH=$ORACLE_HOME/bin:$PATH
export ORACLE_BASE ORACLE_HOME ORACLE_SID PATH
关于.bash_profile和.bashrc的区别
/etc/profile:此文件为系统的每个用户设置环境信息,当用户第一次登录时,该文件被执行.
并从/etc/profile.d目录的配置文件中搜集shell的设置.
/etc/bashrc:为每一个运行bash shell的用户执行此文件.当bash shell被打开时,该文件被读取.
~/.bash_profile:每个用户都可使用该文件输入专用于自己使用的shell信息,当用户登录时,该
文件仅仅执行一次!默认情况下,他设置一些环境变量,执行用户的.bashrc文件.
~/.bashrc:该文件包含专用于你的bash shell的bash信息,当登录时以及每次打开新的shell时,该
该文件被读取.
~/.bash_logout:当每次退出系统(退出bash shell)时,执行该文件
.
另外,/etc/profile中设定的变量(全局)的可以作用于任何用户,而~/.bashrc等中设定的变量(局部)只能继承/etc/profile中的变量,他们是"父子"关系.
~/.bash_profile 是交互式、login 方式进入 bash 运行的
~/.bashrc 是交互式 non-login 方式进入 bash 运行的
通常二者设置大致相同,所以通常前者会调用后者。

[root@localhost ~]#exit (退出登录让设置生效)
[root@localhost ~]# su - oracle
[oracle@localhost ~]$ env | grep ORA
ORACLE_SID=fantlam
ORACLE_BASE=/fantlam
ORACLE_HOME=/fantlam/oracle
[oracle@localhost ~]$
为什么我建立的oracle用户
从root切换至oracle用户是命令行变为-bash-4.1$而不是[oracle @loclhost ~]
麻烦解答一下
非常感谢
为什么我建立的oracle用户 从root切换至oracle用户是命令行变为-bash-4.1$而不是[oracle @loclhost ~]麻烦解答一下 非常感谢